Obsidian: [[16-02-01-Rendering]] [[15-01-01-Shading]] [[11-01-01-U_Rendering]]
pxl.ink Unreal Rendering Features
pxl.ink Unreal Light - Lighe and atmosphere
Art
add different layers of clouds on diff heights to get paralax effect
- HIGH cirrostratus / cirrus / cirrocumulus
- MID altostratus / altocumulus /
- LOW stratus / stratocumulus / cumulus / cumulonimbus
https://sergeneren.com/2019/08/21/creating-low-altitude-clouds/ https://gumroad.com/l/sFTCY/Clouds6m52fv
Unreal Volume
Control in Heightfog and material
Unreal CVars:
- GridSizeZ - how many planes - 32 - 128 Can trade distance for quality
- TemporalReprojection - Temporal smooth
- HistoryWeight -0.1 -flickering layers / 0.9 - ghosting /== how smooth vs how responsive .6/.7
`r.VolumetricFog.GridPixelSize 8`
`r.VolumetricFog.GridSizeZ 128`
`r.VolumetricFog.TemporalReprojection 1`
`r.VolumetricFog.Jitter 1`
`r.VolumetricFog.HistoryWeight`
&  r.SkyAtmosphere
Volumetric Clouds
Solved by using an approximation of realistic scattering by tracing multiple octaves. When near will be replaced with volume fog. Multiple scattering = albedo that is close to a value of 1
Setup
- Eneble volume plugin
- Drag Volumetric Cloud from actors
- In engine content:
VolumetricsContent/tools/CloudCompositing- BP_CloudMask_Object - Scale and move away its asset with single cloud. Have debug plane to create shape
- BP_CloudMask_Generator
- Assign Material:
VolumetricsContent/Content/Sky/Materials - Scene setup: Directional (w atmosphere sun light) / sky atmo / sky light with real time capture / height fog (insc and dircol to Black)/ setting: support atmo affect h fog.
Unreal/Engine/Plugins/Experimental/Volumetrics/Content/Content- volumetric plugin content
M_volumetricCloud_02_Profiles_Soft
`r.VolumetricCloud.ReflectionRaySampleMaxCount`
`r.VolumetricCloud.Shadow.ReflectionRaySampleMaxCount`
`r.VolumetricCloud.ViewRaySampleMaxCount`
`r.VolumetricCloud.SampleMinCount`
`r.VolumetricCloud.DistanceToSampleMaxCount`
`r.VolumetricRenderTarget.Mode` - 0-2
[ Volumetric cloud ] Actor
Cloud Tracing properties enable you to scale the tracing quality of key cloud attributes, like clouds in reflections, shadowing samples for clouds and clouds in reflections, and the distance from the camera that cloud shadowing should stop. The cloud system doesn’t support Ray Tracing, only takes into account the clouds as rendered into the Sky Light.
Layer
Layer Bottom AltitudeLayer Height-Tracing Start Max Distance-Tracing Max Distance-Planet Radis-
Cloud Tracing (balance visual nad perf) Sample Count - To optimize !!!
View Sample Count Scale- Clamped by:r.VolumetricCloud.ViewRaySampleMaxCount- Sample CountRefraction Sample Count scale- rózowy ziomek miał na 1Shadow View Sample Count- !! perfShadow Refraction Sample Count scale- Sky Light quality for reflectionsShadow Tracking Distance- !! perf - range of shadow
[ Directional Light ] Actor
Cast Cloud Shadowson an atmospheric light allows for the cloud volume to shadow scene elementsCloud Shadow Map Resolution Scaledrives the resolution and performance cost of the sunlight shafts. Reducing the radius of the cloud shadow map around the camera with theCloud Shadow Extentproperty can help focus the shadow map resolution for sharper, better results.
Cast Shadows on AtmosphereandCast Shadows on Clouds- Shadowing for large objects is achieved using a large enough Dynamic Shadow Distance or using Far Shadow Distance on the Directional Light to shadow objects that enable the Far Shadow flag in their details.Cloud Scattering Luminance Scaleprovides a nice counterbalance to low light with low octaves count
And also
- strength of shadows
- distance that cloud shadowing happens from the current camera position (in kilometers),
- whether clouds can self-shadow
- whether clouds can cast shadows into the atmosphere
[ Sky Light ] Actor
The Sky Light component uses the Cloud Ambient Occlusion properties for soft ambient shadowing
- When using secondary marching per sample, the cost is driven by values setup on the Volumetric Cloud component with Shadow View Sample Count Scale.
- When the cloud samples the Directional Light Beer Shadow Map (which is also used to cast shadow on meshes), then a single evaluation of the shadow map is done at each ray marched position. The Beer Shadow Map generation is driven by information coming from the setup on the Directional Light component with Cloud Shadow Ray Sample Count Scale.
Ray Marching
paralax occlusion
ray matching -
ray trace - array of features
Quality Modes
r.VolumetricRenderTarget.Mode 0 - recommended option for quality. It supports fast-paced gameplay that may have ground-to-space transitions, or flying through clouds. Clouds are fast to trace but can appear to have low resolution. Traces happen at quarter resolution, reconstruction at half resolution, and upsample on screen at full resolution.
r.VolumetricRenderTarget.Mode 1 balances quality with performance to fit a lot of types of gameplay that are good for ground views. This mode is more expensive but looks higher quality. Traces happen at half resolution, reconstruction and upsample on screen at full resolution.
r.VolumetricRenderTarget.Mode 2 focuses on higher quality while still supporting ground views for real-time gameplay. This mode is fast to trace and looks high resolution, but it does not support cloud intersection with opaque meshes.
Volume material
- Material: Additive & Volume domain. Can be lit or unlit
- Texture: Volume Texture, Created from source texture
- Vector Displacement map (RGBA8)
Ground Contribution - if your frame budget allows.
Conservative Density attribute is used to accelerate the ray marching by skipping expensive material evaluation early on.
Material nodes
[Cloud Sample Attribute] material node
Altitude- Altitude relative to groundAltitudeInLayer- Altitude relative Lowest cloudNormAltitudeInLayer- 0-1 gradientShadow Sample Distance
[Advanced output] material output node
Phase G- [-1,1]Phase G2- [-1,1]Octaves- [0,1]Multi Scattering Contribution- [0,1] How much Contribution from every octaveMulti Scattering Eccentricity- [0,1] How much contribution will be removedMulti Scattering Occlusion- How much became isotropic
To Fake Octaves: Contribution - high Eccentricity/Occlusion - low.
Set in Details
- Octaves - 1- for real time
- Gray Scale Material - Optimization
- Ground Contribution - Add some cost
- Volume Shadow - Handled by atmosphere lights and the volume material
Volume Ray Marchinguses secondary ray marching to get sharp colored shadows- Limited in distance that shadows can be traced due to the limited number of samples that can be used
- Good for ground to sky to space transitions even though they are more expensive.
Beer Shadow Maps (BSM)use to support far shadow distances for clouds and casting shadows on the ground.- Faster to render, but are less accurate and lack volumetric self shadow color.
- Enough for clouds viewed from the ground.
- Xbox One and PlayStation 4, Beer shadow maps are recommended for cloud shadowing.
Niagara
Fluid Ninja Live
Setup
- Add custom trace channel
Edit > Project Sengs > Collisions > TraceChannels(“TraceChannel” and “CollisionChannel” variables to “FluidTrace”)- “Set New trace channel” Name>
FluidTrace, DefResponse>Ignore(all objects will be transparent for NinjaLive line tracers - except dedicated TraceMeshes in NinjaLiveComponent owners.), Trace Channel Index does not maer [if we have a trace channel: delete it add fluid trace and readd old trace channel] - For fps shooter: it have hidden trace channel !!! named Projectiles invisible in options : CHECK: FAQ issue5
Config/DefaultEngine.ini have
+ default channel responsesshould be game trace channel 1
- UV from Hit
Edit > ProjectSettings > Engine > Physics > Optimization- help convert 3d data to 2d fluid spcae
- Enable Apex Destructions
- Copy conternt -
/Content/FluidNinjaLiveto the/Contentfolder of the target project. (And recompile NinjaLive.uasset) - In the level editor, select any NinjaLive Actor on a level. Select NinjaLiveComponent. Check the “Live Compability” group: the top 3 input fields should be set to “FluidTrace”.
Fluid Ninja (manula)
Inputs: Texture. Mat. Scene capture. geometry , (SM Bones sockets Phys Bodies Destructy)
for real time: ~5 itterations
for real time: 1-2 high res area fx and 3-6 character fx - 1k is high res
512x512 area = 6656 Kbytes, 1024x1024 area = 26624 Kbytes, 2048x2048 area = 106496 Kbytes.
6 buffers:
- Paint Buffer - interaction
- Divergence buffer - shockwave like
- Pressure buffer - shockwave like
- Velocity Buffer
- Density
The rendering pipeline uses 8 RenderTargets for a single simulaon container by default:
- 1 four-channel [ RGBA, for CollisionPainter ],
- 5 single channel [ R, for Density and ScalarFields ] and
- 2 bi-channel [ RG, for VectorFields ]
All set to 16 bit precision.
(te set resoluon, bit depth, channel usage)
2d fluid sim
- using volume to track Pos and Vel > to Linetrace form cam to 2d
- display on cam facing plane
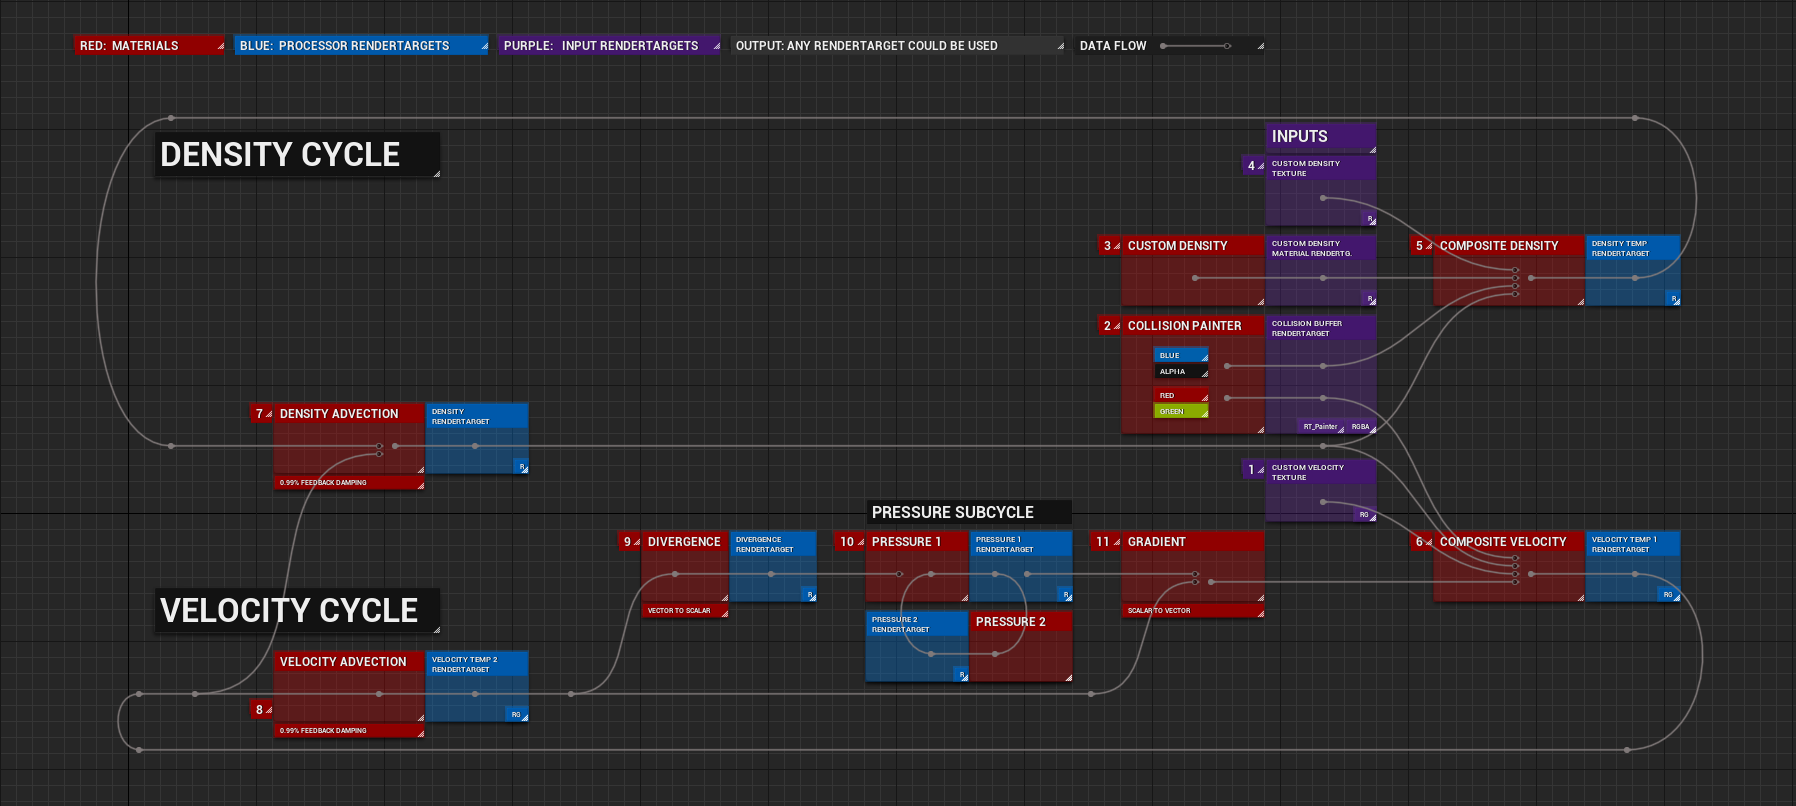
- Red are processing mat
- Blue are outs to render target render buffer
TRACE LINES
use custom line trace:
- normaly projecting from camera to billboard plane . for rotationali fixed sim contianers . !!!
use custome trace position on component. lvl 21
RenderTarget
- this is what we call “Collision Painter”.
The switch is located at NinjaLiveComponent Details /Live General /SimplePainterMode (at the very bottom)
Parts
Ninja Live (RED)
Actor class object BP - “sim container” / “sim area”. Details: Activation, Interaction, Debug, ComponentOverrides.
Filter interactions, change material.
Activation volume(usually much larger than the sim area): the proximity of any user defined agent could switch the sim component between wake/sleep states. For example: a player pawn is entering the 1000 meter range of a sim area, area wakes up, initializes, acquires pre-generated render targets from the memory manager, and gets ready to encounter the player.Interaction volume(usually same size as the sim area): detecting overlapping / colliding objects and forwarding the spatial information + velocity to the sim component. Using the interaction volume, anything could interact with the simulation: Static- and Dynamic Meshes, Skeletal Meshes, Physics Bodies.
Ninja Live Component
Actor Component class “sim component” - more parameters (sim presets / materials) Details: Activation, MemoryManagement, Performance, Compatibility, Debug, Generic, Interaction, BrushSettings, Raymarching
Ninja Live Memory Pool Manager (BLUE)
Ninja Live Utilities (GREEN)
Can add to actor
Ninja Live Preset Manager (BLACK)
“Collision Painter”
Custom GUI, Memory Manager, and Interface Controller.
Noise
A better strategy is stacking 3 layers of lower resolution 3D noises (128^3 for example) instead of 2 high resolution. And because the 3 layers have aggressively larger scale, they make up for low resolution:
| instr pre level | lookup table | COST | ||||
|---|---|---|---|---|---|---|
| Regular Texture | 0 | |||||
| Fast Gradient | 3d tex | ~16 | 1 | High quality but not for bumps (baked to a volume texture) | Always tiles | 0 |
| Value | Computational | ~53-118 | Low quality but computational | yes | 1 | |
| Gradient | Tex Based | ~61-74 | 8 | High Quality | always but <=128 | 1.5 |
| Simplex | ~77 | 4 | High Quality | no | 1.5 | |
| Gradient | Computational | ~80-143 | High Quality | yes | 3 | |
| Voronoi Q1 | 8 cells x20 | ~160 | 6 | |||
| Voronoi Q2 | 16 cells x20 | ~320 | 8 | |||
| Voronoi Q3 | 27 cells x20 | ~540 | 8 | |||
| Voronoi Q4 | 32 cells x20 | ~640 |
Tiling Noise > Repeat Size (Repeat Size matches the sampled size that you will be baking out.)
High Quality Clouds
- Cloud Actor: Tracing section, increase the sample count scale for View, Reflections, and Shadows.
- Material node: Ground Contribution / up octaves to 2
- Light: Cast Cloud Shadow (+map Resolution Scale - heavy)/ Cast Shadows on Clouds / per Sample Atmospheric Light Transmittance / Light Shaft Occlusion
- Choose one of those:
r.SkyAtmosphere.FastSkyLUT 0- Disabling this optimization is slower to render, but produces fewer visual artefacts with high-frequency detail that can appear in places like the earth’s shadow or scattering lobe.r.SkyAtmosphere.FastSkyLUT 1
r.SkyAtmosphere.AerialPerspectiveLUT.FastApplyOnOpaque 0- Trace Sample Count Scale to adjust the number of samples used. If the max range isn’t enough, use the command
r.SkyAtmosphere.SampleCountMaxto choose a higher limit and manually enter a value in the property field. r.SkyAtmosphere.FastSkyLUT.Widthandr.SkyAtmosphere.FastSkyLUT.Height- mprove the quality of sunlight shaftsr.SkyAtmosphere.AerialPerspectiveLUT.Width- quality of fog on opaque and transparent surfaces
r.VolumetricRenderTarget 0 -
r.VolumetricCloud.HighQualityAerialPerspective 1 - aerial perspective for clouds to use high quality ray tracing instead of low resolution LUTs
##### Low Level Settings
to the host actor class
in your Actors, apply the directly specified

- **Actor Details** - Activation, Interaction, Debug, Component Overrides.
- **Component Details** - Activation, Memory Management, Performance, Combability, Debug, Generic, Interaction,
Brush Settings, Raymarching


##### Spawn
- Ninja Live fluid sim Actors at your levels -
- or add Ninja Live fluid sim Component to your own object classes. To make fluid sim Component work properly
Pseudo-Volume
SDF
VDB SDF Sparse volume that define distance to surface. (How far away from edge (positives outside cause its distance )). Black at 0. so can see if in/out.
ray matchingTake big step and check how big next step should be. cause in fsd u know how far you are.
VOLUME FAKE 6 point lightmap
Cool! You can also output these directional lightmaps automatically in ue4 using the Volumetrics plugin along with the motion vectors. I have been meaning to post about that. https://twitter.com/Vuthric/status/1286796950214307840
pseudo volume smoke houdini
https://viktorpramberg.com/smoke-lighting
https://shaderbits.com/blog/ue4-volumetric-fog-techniques
https://www.youtube.com/watch?v=739NOjhLVnI, http://asher.gg/, Inside Unreal (Expand Your World With Volumetric Effects)](https://www.youtube.com/watch?v=R2RQm_Bu81I) - forum thread
volume fog layers nice